Knots and Lashings
Knots & Lashing
WHIPPING
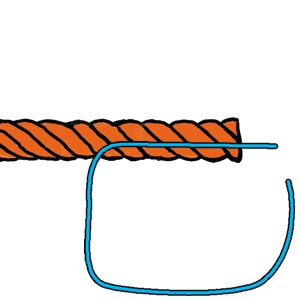
Whipping the end of a ropePurpose: Whip the ends of ropes to prevent fraying and prolongs the life of the rope.
Tying: Lay the twine against the rope and wrap the long end around the rope about 8 turns. Make a bight in the short end. Wrap the long end about 8 more times around both the rope and the bight. On the final turn pass the long end through the bight. Pull the short end to hide and secure the long one. Trim the ends off.
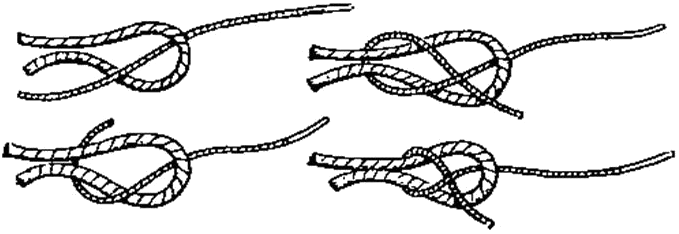
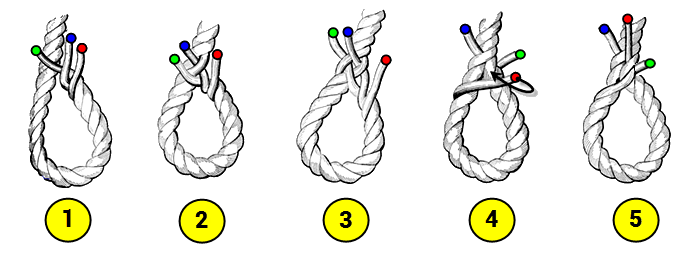
REEF KNOT


- An excellent general purpose knot for tying two pieces of string or twine together, the reef knot is possibly the most commonly used knot for the job, and is easy to learn. However, it cannot be overly stressed that the Reef knot is not a long term or secure knot, and it should only be used to finish parcels or bindings. In other cases, use a more secure method of bending two ropes together, such as a Sheetbend, a Double Sheetbend, or a Fisherman’s Knot.
- Unfortunately, the Reef knot can easily change into a slipping Lark’s Head (see below), so it should never be used where life or limb are at risk.
- Holding one end of each rope in each hand, pass the left rope over the right, and tuck under. Then pass the same rope, now in the right hand, over the left rope, and tuck under.
- It is common to chant “Left over Right and Under, Right over Left and Under” when tying the knot. (This can also be performed as “Right over Left and Under, Left over Right and Under”.)
- The reef knot can easliy be undone by gripping one loose end, and pulling it back over the knot, in the opposite direction, thus straightening the rope which is pulled. The other rope forms a Lark’s Head knot, and slips off the tugged rope.
- The knot gets its name from its use on sailing ships, when the sails were “reefed” – rolled up and tied to the cross spar with a reef knot. To release the sail, the sailors would climb the rigging, and work their way along the cross spar, pulling the top end of the reef knot down. They only had to use one hand, holding on with the other. The weight of the sail would cause the reef knot to slip, and the sail would be released.
Tip. If you want to tie two ropes together of similar thickness then never use a Reef knot. Only use it with string and twine when tying parcels, whippings and bindings.
Tip. Never use this knot to join ropes of two different thicknesses.
SHEET BEND

- The Sheetbend is commonly used to tie two ropes of unequal thickness together. The thicker rope of the two is used to form a bight, and the thinner rope is passed up through the bight, around the back of the bight, and then tucked under itself.
- The knot should be tied with both ends coming off the same side of the bend, as illustrated here. However it can easily be accidentally tied with the ends coming off opposite sides of the bend, when it is known as the Left Handed Sheet Bend. The Left Handed Sheet Bend is to be avoided as it is less secure.
Tip. If the ropes are of very unequal thickness, or placed under a lot of tension, use a Double Sheetbend.
CLOVE HITCH


- Use to attach a rope to a pole, this knot provide a quick and secure result. It rarely jams, and can in fact suffer from the hitch unrolling under tension if the pole can turn. Often used to start and finish lashings.
- With practice, this can be easily tied with one hand – especially useful for sailors!
Tip. If you are in a situation where the clove hitch may unroll, add a couple of half hitches with the running end to the standing end of the knot, turning it into a “Clove Hitch and Two Half Hitches”!
Tip. When pioneering, use the Round turn and two half hitches to start and finish your lashings instead of the Clove Hitch. It won’t unroll, and is easier to finish tying off. It just does not look so neat!
BOWLINE KNOT
- A commonly used knot to tie a loop in the end of a rope. It has the advantage of not jamming, compared to some other loop forming knots (for example when using an overhand knot on a large bight to form a loop).
- Form a small loop (the direction is important), and pass the free end of the knot up through the loop, around behind the standing part of the rope, and back down through the loop.
- A chant used by many to remember this knot is “The rabbit comes out of the hole, round the tree, and back down the hole again”, where the hole is the small loop, and the rabbit is the running end of the rope.
- In the same way that a Left Handed Sheet bend is a Sheet bend that has the running end of the rope coming out of the wrong side of the knot, a cowboy bowline is a bowline that also has the running end of the rope coming out of the wrong side of the knot. It suffers the same problems as the left handed sheet bend.
- Tip. Don’t be afraid to use this knot to form a loop of any size in rope.
- Tip. To quickly identify if you have tied the Bowline normal or left handed, check to see that the running end exits the knot on the inside of the loop.
- Tip. For added security, finish the knot with a stop knot such as a Figure of Eight knot to remove any possibility of the Bowline slipping.
- Tip. If you use this knot in a man carrying situation – perhaps a rescue where a harness is unavailable – then you MUST use a stop knot as mentioned above.
SHEEP SHANK

- The Sheepshank is a shortening knot, which enables a rope to be shortened non-destructively.
- The knot is only really secure under tension, it will fall apart when slack. (See tip below.)
- Tip. Use up to five half hitches each end of the Sheepshank to make the knot more secure, and for fine tuning the shortening.
- Tip. Never cut ropes to shorten them! Always use a shortening knot such as the Sheepshank, or coil the excess.
FISHERMAN’S KNOT


Fisherman’s knot (Angler’s knot, English knot, Englishman’s bend, Halibut knot, True Lover’s bend, Waterman’s knot)
- The Fisherman’s knot is used to tie two ropes of equal thickness together. It is used by fishermen to join fishing line, and is very effective with small diameter strings and twines.
- Tie a Thumb knot, in the running end of the first rope around the second rope. Then tie a thumb knot in the second rope, around the first rope. Note the Thumb knots are tied such they lie snugly against each other when the standing ends are pulled.
Tip: When tying knots in monofilament line, moisten the line before pulling the knot tight. Th
is helps to stop the line heating up with friction, which weakens it.
ROUND TURN & TWO HALF HITCHES.

- Used to secure a rope to a pole, or to start or finish a lashing. Pass the running end of the rope over the pole twice. Then pass the running end over the standing part of rope, and tuck it back up and under itself, forming a half hitch. Repeat this for a second half hitch.
- This knot has a redeeming feature – it rarely jams!
Tip: Superior to a Clove Hitch for starting and finishing a lashing as the half hitches prevent this knot from unrolling, as they have the effect of locking the knot. The Clove Hitch looks neater (!) but it has a tendancy to unroll, and can be difficult to tie tightly when tying off.
SHEAR LASHING MARK 1 (ROUND OR PARALLEL LASHING)
SHEAR LASHING MARK 2

- Used to lash two poles together (constructing a flagpole).
- Tie a clove hitch round the bottom pole.
- Wind the rope around both six or seven times.
- Finish with two half hitches round both poles.
- The lashing can be tightened by driving a small wooden peg between the poles.
- If possible force a wedge under the lashings to make them really tight.
- If the spars are vertical, bang the wedge in downwards.
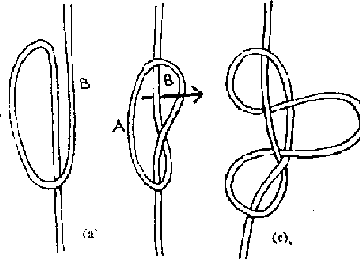
FIREMAN’S CHAIR KNOT

Make half hitch. Right under left. Make a second half hitch. Again right under left. Bring right hitch in front of left hitch.
Grab hitches as shown. Pull through. Make another half hitch. Put loop through. Make half hitch on the left. Put loop through. Pull ends to tighten

Use: The fireman’s chair knot is a rescue knot. There are two loops formed. One which goes under the arms; the other under the legs of person.
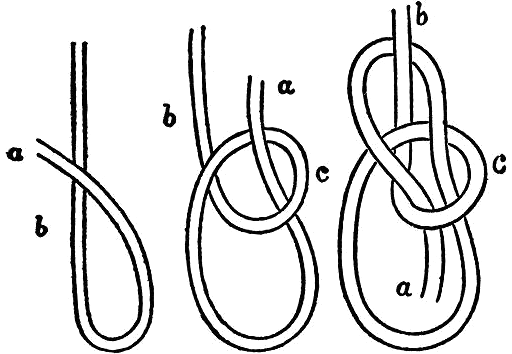
MAN HARNESS KNOT
The principal use of this knot is to make a loop in the middle of a rope that is being used for hauling or climbing. A man can then use the loop as a harness over his shoulder so he can put his full weight to its best use. Form an underhand loop as shown at top. Grasp the loop at (A) and lay it over the part of rope shown by the arrow. The result will be shown in the middle drawing. Now grasp the rope at (B) and draw it up under and over as shown at bottom. This forms the bight which becomes the loop for your shoulder. Draw the knot tight before using it.
DRAW HITCH OR HIGHWAY MAN’S HITCH
The highwayman’s hitch is a type of knot. It is a quick-release, draw loop hitch popular for temporarily securing horses. There are two main features to this hitch. It can be untied with a tug of the working end, and the working and standing ends are released on the same side of the object (ex. pipe fence rail) that was tied on to.
Both of these features are desirable when dealing with horse emergencies where a panicked animal may be straining against a tied off lead rope. Because the working (free) and standing (horse) ends release on the same side of the object tied to, the free end of the rope is not whipped around behind the rail by the animal, thereby forcing the quick-release grip on the rope to be abandoned.
The knot is three bights linked through one another. To tie, begin by forming a bight behind the pole. Next, pass a bight formed from the standing part (the end that will receive tension) over the pole and through the first bight. Then, pass a bight formed from the working end over the pole and through the second bight. Pull the standing part tight to ensure that it holds. Until the knot is tightened and properly dressed the highwayman’s hitch has little holding power. When properly tied to posts or rails of approximately 2.5 – 3 inches diameter using the large diameter, compressible ropes commonly used for hose leads, it can be a remarkably secure knot.
BOWLINE ON A BITE
Tying it: The Bowline on a Bight should be easy to tie but because it is initially hard to visualize it can be confusing. This knot was actually one of the justifications for preparing all of our animations.
Uses: The Bowline on a Bight makes a secure loop in the middle of a piece of rope. It does not slip or bind. It is satisfying to start with a plain length of rope and finish with a secure safe loop in its middle. See also the Alpine Butterfly Loop.
DIAGONAL LASHING
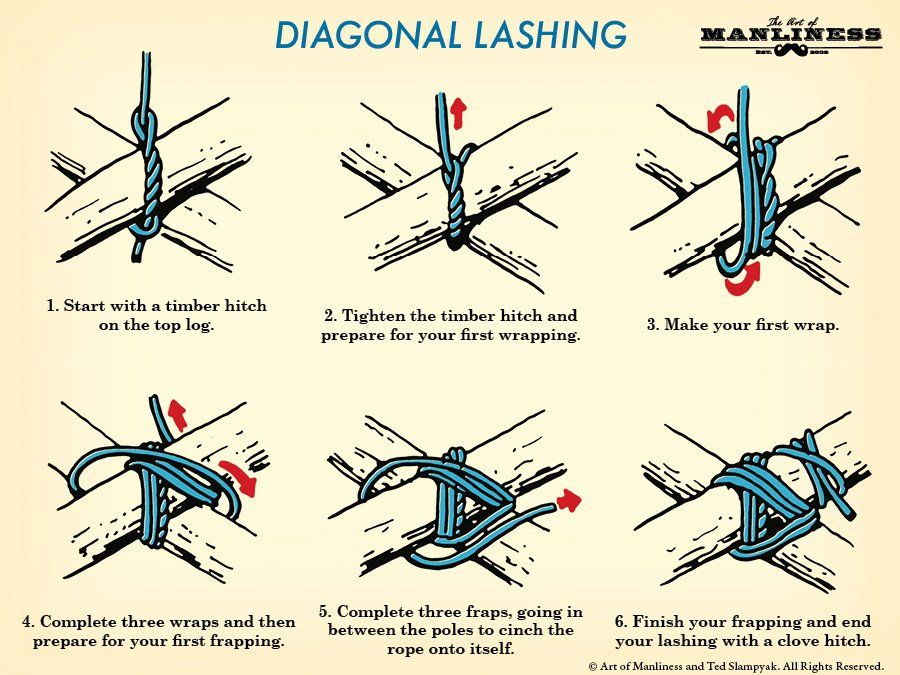
A Diagonal Lashing is used to bind two poles together that cross each other but do not touch (or are likely to be pulled apart) when their ends are lashed in place in a structure. Often used for securing diagonal braces used to hold a structure rigid.
When wooden poles are used in a lattice like structure a combination of Diagonal and Square lashings is used to hold them together.
The Diagonal Lashing can be used to bind poles that cross at an angle of between 90 to 45 degrees. If the angle between the poles is less than 45 degrees a sheer lashing should be used.
Note: If a square lashing was used to bind poles that do not touch the beginning clove hitch would pull the cross pole towards it causing unnecessary bowing of the cross pole and could also produce a force that would act along the length of the pole to which the clove hitch is tied. This could place unnecessary strain on other lashings and cause the structure to twist and fail.
Step by Step Guide
- Tie a Timber Hitch horizontally around two poles crossed diagonally. Pull tight. Take the working end around to the back of poles ready for the first turn.
- Start the wrapping turns on the opposite diagonal to the timber hitch. Pull the rope tight so that the poles contact each other. Make three full horizontal turns around both poles and over the Timber Hitch. Pull each turn tight as it is made.
- Change the direction of the turns by taking the rope behindhe poles a the bottom of the lashing then to the front of the poles at the top. Try to go around the pole when changing direction to avoid crossing the first set of wrappings diagonally.
- Make three vertical wrapping turns around the crossed poles tightening each turn before making the next one. Be sure to keep them parallel.
- Tighten the lashing with a frapping turn by going past and around one of the poles and then threading the rope alternately behind then in front of each pole. This will help to secure the lashing.
- Make two more frapping turns, pulling each one tight as it is completed.
- End the lashing with a clove hitch by taking the first half hitch of the clove hitch by going past and then around one of the poles. Lock the half hitch tight against the lashing by working it tight and pulling it from below.
- Take a second half hitch around the pole and work it tight against the first so that the clove hitch is locked tight against the lashing.
WHIPPING
WEST COUNTRY WHIPPING:-

Pass the twine round the rope and tie an overhand knot. Repeat behind the rope and tie another. Continue making overhand knots in front and behind to reach the diameter of the rope. Finish with a square (reef) knot. Or add more overhand knots, thread the ends through the rope and trim them.Animation To photograph this animation, large diameter cord was used. When tied with normal whipping twine, this makes a satisfactory, neat whipping.
Uses: The West Country Whipping (ABOK # 3458, p 548) must be the easiest whipping to teach and learn – merely a series of overhand knots completed with a reef knot! No equipment is required except the whipping twine. At best, it is only a reasonably satisfactory way of securing the end of a rope. The final reef knot can shake loose followed by each overhand knot. However, it does fail slowly – the overhand knots work their way loose in succession and, as each one loosens, an opportunity is presented to procrastinate: tie another reef knot and put off having to whip the end properly with a better whipping.
Techniques: There are several variations of this whipping:
- Where to Start: When whipping a rope’s end it seems natural to wind the twine outwards towards the end. There is, however, an advantage in starting at the end and winding the twine inwards: when the whipping is completed, the ends can be pulled through the body of the rope to prevent them unravelling.
- Reef Knot: The classic description completes this whipping with a reef knot with the ends trimmed. A heavily used rope will shake this reef loose. If a needle is available it is worth burying the ends by pulling them through the rope.
- Multiple Reefs: The West Country can be completed with a stack of reef knots but this leaves an unsightly tail. If a needle is available, this string of reefs can be pulled through the rope to bury it.
- Start with a Constrictor: A quick way to start the West Country is to drop a Constrictor Knot on the end before tying overhand knots. This has the advantage of quickly gaining very secure control of the rope’s end. It also leaves a fairly reliable last defense if the whipping comes undone.
SAILORS WHIPPING:-
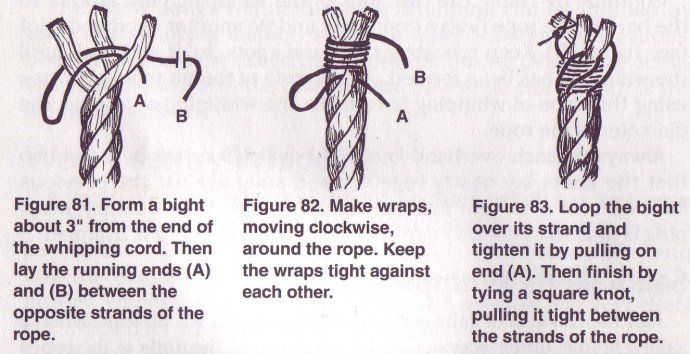
With the end taped or burned, lay the whipping twine aginst the rope and tightly wind the twine round until the twine is secured – usually eight to ten turns. Make a loop and wind the loop round the rope and the twine – another eight to ten turns. Pull tight, & cut the ends off close to the rope.Animation To photograph this animation, large diameter cord was used and only a few turns were applied. When tied with normal whipping twine, many more turns are used.
Uses: The Sailor’s Whipping (ABOK # 3443, p 546) is probably regarded as the classic simple whipping. It can be tied with no needle and when tied tightly provides a very satisfactory, neat end to a rope. With a little practice, and the appropriate size of whipping twine, the appearance is of a cylinder of stacked turns and the ends are invisible.
Techniques: There are several variations of this whipping:
- Using a Bight for the Finish: The second half of the whipping can be wrapped round a bight formed with the first short end. The final end is then inserted into this bight which is then pulled through.
- Round Turns Between the Ends: After the first end is securely contained by 8 – 10 turns and trimmed, several turns are often laid before the final end is wrapped in. This separates the exit points for the ends and makes it easier to conceal them.
SPLICING
EYE SPLICE:-
Unravel enough for 5 tucks. Tape the rope. Arrange strands. Pass center one under a standing strand. Pass lower one under lower adjacent standing strand. Pass the upper strand under the upper adjacent standing strand. Repeat this process with the center strand, the lower strand, and the upper strand. Continue to create five complete sets of tucks. Pull tight.Important: The Eye Splice and its variants are well described by Ashley (ABOK # 2725, p 445). Modern synthetic materials, however, tend to be slippery and, now, a minimum offive complete “tucks” is required. For mooring, tow lines, and other long term or critical applications, seven tucks are recommended. The animation above only shows the threading of two complete tucks with the final image showing four tucks finished and tightened.
Esssential Preparation: Secure the end of each strand by heat, tape or whipping twine. Measure the length to be unraveled and secure the rope at that length with tape or twine. The correct length to unravel is about 3 times the diameter per “tuck”, i.e., for five tucks in half inch diameter rope, leave the free strands at least 7.5 inches long; and for seven tucks at least 10.5 inches. Create the required size of loop and mark the rope. In the illustration above the mark would be on the blue standing end where the first red tuck is to be threaded.
Technique: The illustration above shows two complete tucks being created. In tightly laid or large diameter rope, it may be difficult or impossible to pass each strand under the standing strand without a tool. The following have all worked for me under different circumstances.
Merely wrapping each end in masking tape can provide you with a “spike” to feed under the standing end. Alternatively, use a suitable spike to open up a standing strand. It may stay open long enough for the strand to be threaded.
I have used many different spikes including marlin spikes, pencils, pens, and needle nosed pliers. Finally, the best tool is undoubtedly a fid, a spiked aluminum bar with a hollow end, which opens up the standing strand. You then push the strand through inserted in the tail of the fid.
Structure As in weaving, each of the strands is passed first under and then over alternate standing strands. In the process, the free ends tend to untwist and become untidy. Handle each strand with care to retain its original twist: after each strand is threaded, twist it to try to restore its original fimness – at least for the first two or three tucks.
Holding the Rope: Having prepared the ends and chosen which strand to thread where, it is then all too easy to get confused after it is threaded. Hold the other two tails in your hand, one each side of the rope; they will then be in the correct place when you want to choose an end to thread next (picture on left).
Finishing the Splice: If the ends have been cut to the correct length, they will be used up in the splice. If they are a little too long, it is usually far less trouble to make another tuck than to cut them and reburn them to stop them unraveling. The burned ends are usually slightly larger than the strand and this provides some of the security of the splice.
Tapering the tails: It used to be fashionable to gradually thin the strands for an additional few tucks. In tarred hemp this made a very elegant tapered splice. Modern rope is sufficiently slippery to mean that the tapered tails tend to get dislodged and make the splice look very untidy. True tapering of individual strands is rarely done now and should probably never be attempted by amateur, occasional, splicers.
Alternative Taper: After sufficent tucks have been made for strength, cut and burn one stand and then continue the splice with remaining two strands. Cut and burn one more and splice the remaining strand before cutting and burning it too.
SHORT SPLICE:-

Begin by unlaying (untwisting) the ropes a few turns. If the rope is large, make temporary whippings on the ends of the strands.
- Alternate the strands of the two ropes.
- Tie strands down to prevent more unlaying.
- Tuck strand 1 over an opposing strand and under the next strand.
- Tuck of strand 2 goes over strand 5, under the second, and out between the second and third.
- Repeat operation with strands 1 and 3 from same rope end.
- Remove tie and repeat operation on other rope end. Make two or more tucks for each strand. Then roll the tucks and cut off ends.
You can smooth the splice by rolling it under your foot on the floor.
BACK SPLICE:-

Form a Crown Knot by tucking each strand over its neighbor and back down beside the standing end. Splice each strand into the rope by passing it over and under alternate strands in the standing end. Three complete tucks – two more than the one shown here – are sufficient.
Uses: The Back Splice (ABOK # 2813, p 462) provides a secure method of preventing the end of a rope from fraying.
Structure: The back splice consists of two parts: a Crown (on right) to redirect the strands back towards the standing end; and the braiding to tuck the ends into the standing strands. About three complete “tucks” are sufficient as no load is applied to a back splice.
Disadvantages: It makes a bulky end to a rope and usually prevents the rope’s end from passing though blocks and pulleys. For most purposes, a whipping is preferred – see Sailmakers, Sailors, or West Country whipping.
Advantages: No additional tools or equipment are required and it is easily learned and quickly tied.
Splice the Mainbrace: History of Grog: Ashley’s (Splicing Section p 461), explains that Splicing the Mainbrace meant serving Grog to all hands at the completion of some particularly arduous labor. He omits the explanation that Grog was named after its inventor Admiral Edward “Old Grog” Vernon so named for the admiral’s waterproof Grogam coat (sometimes spelled Grogram). Grogam (or Grogram) is defined as a thick material which was a combination of silk, mohair and wool often stiffened with gum.


Comments
Post a Comment