bp6 exercise
BP’S SIX
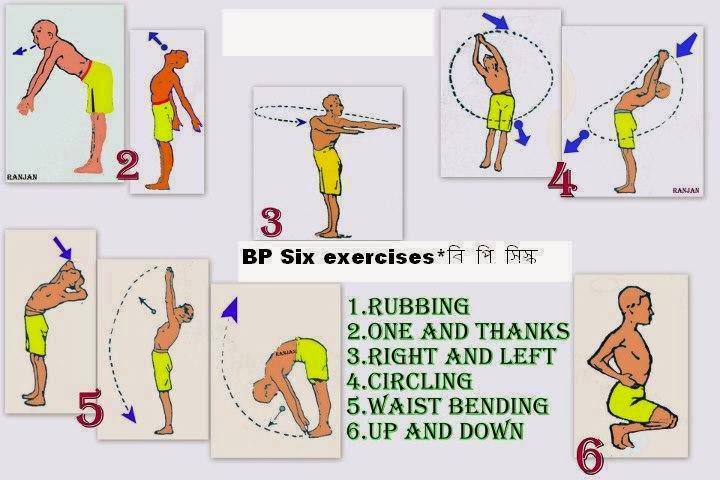
I EXERCISE
For the Head: Rub the head and face, firmly over several times with the palms and fingers of both hands. Thumb the muscles of the neck and throat.
II EXERCISE
For the Chest: From upright position bend to the front, arms stretched downwards, with back of the hands together in front of the knees. Breathe out. Raise the hand gradually over the head and lean back as far as possible, drawing a deep breath through the nose as you do. Lower the arms gradually to the sides, breathing out the word “Thanks” through the mouth. Lastly, bend forward again, breathing out the last bit of breath in you, and saying the number of times you have done it in order to keep count.
Repeat this exercise 12 times.0
Repeat this exercise 12 times.0
III EXERCISE
For the Stomach: Standing upright, send out both arms, fingers extended, straight to the front, then slowly swing round to the right from the hips without moving the feet, and point the right arms as far round behind you as you can, keeping both arms level with, or a little higher than, the shoulders. Then, after a pause, swing slowly round as far as you can to the left. Breathe in when pointing to the left. “Body twisting”.
Breathe out when pointing to the right. Repeat six times, change the breathing to the other side and repeat six times.
Breathe out when pointing to the right. Repeat six times, change the breathing to the other side and repeat six times.
IV EXERCISE
For the Trunk: This is also called the “Cone Exercise”. Standing at “Attention” position, raise both hands, as high as possible over the head, and link fingers. Lean backwards, and then sway the arms very slowly round in the direction of a cone, so that the hands make a wide circle above and around the body, the body turning from the hips, and leaning over one side. Then to the front, then to the other side, and then back.
After completing the circle, start in the opposite direction. Repeat six times both ways. Breathe in when leaning backward and breathe out when leaning forward.
After completing the circle, start in the opposite direction. Repeat six times both ways. Breathe in when leaning backward and breathe out when leaning forward.
V EXERCISE
For Lower Body and Back of Legs: Stand with feet slightly apart, touch your head with both hands and look up into the sky, leaning back as far as you can, and then bend forward and downward till your fingers touch your toes, without bending your knees.
Repeat 12 times.
Repeat 12 times.
VI EXERCISE
For Legs, Feet and Toes: Stand in ‘Attention’ position, put the hands on the hips, stand on tip-toe, turn the knees outwards, and bend them slowly down to a squatting position, keeping the heels off the ground the whole time. Then gradually raise the body and come to the first position again.
Repeat this 12 times. Breathe in as body rises and breathe out as the body sinks.
Repeat this 12 times. Breathe in as body rises and breathe out as the body sinks.
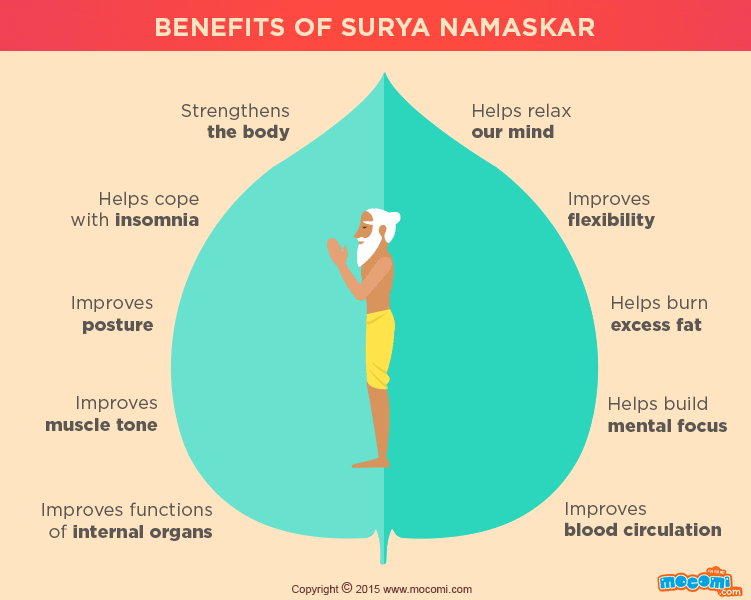
SURYA NAMASKAR
STEP 1. PRANAMASANA (PRAYER POSE)

Stand at the edge of your mat, keep your feet together and balance your weight equally on both the feet. Expand your chest and relax your shoulders. As you breathe in, lift both arms up from the sides, and as you exhale, bring your palms together in front of the chest in prayer position.
STEP 2. HASTAUTTANASANA (RAISED ARMS POSE)

Breathing in, lift the arms up and back, keeping the biceps close to the ears. In this pose, the effort is to stretch the whole body up from the heels to the tips of the fingers.
Tip to deepen this yoga stretch:
You may push the pelvis forward a little bit. Ensure you're reaching up with the fingers rather than trying to bend backward.
STEP 3. HASTAPADASANA (STANDING FORWARD BEND)

Breathing out, bend forward from the waist keeping the spine erect. As you exhale completely, bring the hands down to the floor beside the feet.
Tip to deepen this yoga stretch:
You may bend the knees, if necessary, to bring the palms down to the floor. Now make a gentle effort to straighten the knees. It's a good idea to keep the hands fixed in this position and not move them henceforth until we finish the sequence.
Tip to deepen this yoga stretch:
You may bend the knees, if necessary, to bring the palms down to the floor. Now make a gentle effort to straighten the knees. It's a good idea to keep the hands fixed in this position and not move them henceforth until we finish the sequence.
STEP 4. ASHWA SANCHALANASANA (EQUESTRIAN POSE)

Breathing in, push your right leg back, as far back as possible. Bring the right knee to the floor and look up.
Tip: How to deepen this yoga stretch?
Ensure that the left foot is exactly in between the palms.
Tip: How to deepen this yoga stretch?
Ensure that the left foot is exactly in between the palms.
STEP 5. DANDASANA (STICK POSE)

As you breathe in, take the left leg back and bring the whole body in a straight line.
Tip to deepen this yoga stretch:
Keep your arms perpendicular to the floor.
Tip to deepen this yoga stretch:
Keep your arms perpendicular to the floor.
STEP 6. ASHTANGA NAMASKARA (SALUTE WITH EIGHT PARTS OR POINTS)

Gently bring your knees down to the floor and exhale. Take the hips back slightly, slide forward, rest your chest and chin on the floor. Raise your posterior a little bit. The two hands, two feet, two knees, chest and chin (eight parts of the body) should touch the floor.
STEP 7. BHUJANGASANA (COBRA POSE)

Slide forward and raise the chest up into the Cobra pose. You may keep your elbows bent in this pose with the shoulders away from the ears. Look up at the ceiling.
Tip to deepen this yoga stretch:
As you inhale, make a gentle effort to push the chest forward; as you exhale, make a gentle effort to push the navel down. Tuck the toes under. Ensure you're stretching just as much as you can and not forcing your body.
Tip to deepen this yoga stretch:
As you inhale, make a gentle effort to push the chest forward; as you exhale, make a gentle effort to push the navel down. Tuck the toes under. Ensure you're stretching just as much as you can and not forcing your body.
STEP 8. ADHO MUKHA SVANASANA (DOWNWARD FACING DOG POSE)

Breathing out, lift the hips and the tailbone up to bring the body into an inverted ‘V’ pose.
Tip to deepen this yoga stretch:
If possible, try and keep the heels on the ground and make a gentle effort to lift the tailbone up, going deeper into the stretch.
Tip to deepen this yoga stretch:
If possible, try and keep the heels on the ground and make a gentle effort to lift the tailbone up, going deeper into the stretch.
STEP 9. ASHWA SANCHALANASANA (EQUESTRIAN POSE)

Breathing in, bring the right foot forward in between the two hands. The left knee goes down on the floor. Press the hips down and look up.
Tip to deepen this yoga stretch:
Place the right foot exactly between the two hands and the right calf perpendicular to the floor. In this position, make a gentle effort to push the hips down towards the floor, to deepen the stretch.
Tip to deepen this yoga stretch:
Place the right foot exactly between the two hands and the right calf perpendicular to the floor. In this position, make a gentle effort to push the hips down towards the floor, to deepen the stretch.
STEP 10. HASTAPADASANA (STANDING FORWARD BEND)

Breathing out, bring the left foot forward. Keep the palms on the floor. You may bend the knees, if necessary.
Tip to deepen this yoga stretch:
Gently straighten the knees, and if you can, try and touch your nose to the knees. Keep breathing.
Tip to deepen this yoga stretch:
Gently straighten the knees, and if you can, try and touch your nose to the knees. Keep breathing.
STEP 11. HASTAUTTANASANA (RAISED ARMS POSE)

Breathing in, roll the spine up. Raise the hands up and bend backward a little bit, pushing the hips slightly outward.
Tip to deepen this yoga stretch:
Ensure that your biceps are beside your ears. The idea is to stretch up more rather than stretching backward.
Tip to deepen this yoga stretch:
Ensure that your biceps are beside your ears. The idea is to stretch up more rather than stretching backward.
STEP 12. TADASANA (MOUNTAIN POSE)

As you exhale, first straighten the body, then bring the arms down. Relax in this position and observe the sensations in your body.
This completes one set of Surya Namaskar. Complete the round by repeating the steps. Only this time, start with taking the left foot behind in step number 4 and bringing the right foot forward in step number 10. Once done, you would’ve completed one round of Surya Namaskar.
This completes one set of Surya Namaskar. Complete the round by repeating the steps. Only this time, start with taking the left foot behind in step number 4 and bringing the right foot forward in step number 10. Once done, you would’ve completed one round of Surya Namaskar.


Comments
Post a Comment